Introduction
Kitchen tile grout is a magnet for dirt, grime, and stains, making it challenging to maintain a pristine kitchen appearance. However, with the right techniques and little effort, you can restore your kitchen’s tile grout to its former sparkling glory. Follow step-by-step instructions from AEG Cleaning Services to learn how to clean kitchen tile grout efficiently:
1. Gather Your Cleaning Supplies
Before you begin, assemble the necessary supplies. You’ll need a stiff-bristled brush, baking soda, white vinegar, hydrogen peroxide, a spray bottle, warm water, and protective gloves.
2. Prepare a Cleaning Solution
Next, create a powerful homemade cleaning solution by mixing equal parts of baking soda and water to form a paste. For tougher stains, substitute water with hydrogen peroxide or vinegar. Stir in the mixture until it forms a smooth consistency.
3. Applying the Cleaning Solution to Grout Lines
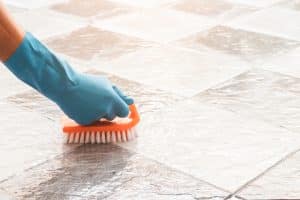
Using a stiff-bristled brush or an old toothbrush, generously apply the cleaning paste to the grout lines. Moreover, ensure that the paste covers the grout thoroughly. Let it sit for 10-15 minutes to allow the solution to penetrate and loosen the dirt.
4. Scrubs and Work on Stubborn Stains
With the brush, scrub the grout lines vigorously in a circular motion. Concentrate on areas with stubborn stains or discoloration. For tough stains, apply a bit more pressure or reapply the cleaning paste and let it sit for an additional few minutes before scrubbing.
5. Rinse and Wipe Clean
Using a spray bottle filled with warm water, rinse the grout lines thoroughly. And then wipe away the cleaning solution and loosened dirt with a clean cloth or sponge. Ensure you remove all residues to prevent any leftover cleaning agents from accumulating and attracting dirt in the future.
6. Apply Vinegar Solutions for Extra Shine (Optional)
Moreover, for added shine and disinfection, mix equal parts of white vinegar and water in a spray bottle. Lightly spray the solution onto the cleaned grout lines and let it sit for a few minutes. Then, rinse it off with clean water and wipe dry.
7. Seal the Grout (Optional)
Finally, consider applying a grout sealer after cleaning to protect the grout from future stains and moisture. Follow the manufacturer’s instructions for the application process.
Conclusion:
Regular maintenance and proper cleaning techniques are vital for keeping your kitchen tile grout looking fresh and clean. By using readily available household items and following these steps, you can effectively tackle even the toughest grout stains, restoring your kitchen’s tiles to their original shine.
Remember, consistency is key to maintaining clean grout lines. Implementing these cleaning methods regularly will not only enhance the appearance of your kitchen but also prolong the life of your tile grout.
Keep your kitchen space inviting and hygienic by incorporating these simple yet effective techniques into your cleaning routine. Your beautifully cleaned tile grout will surely impress guests and make your kitchen a more pleasant place to be.
FAQs
1. Why is grout cleaning important for kitchen tiles?
Grout cleaning is essential because grout, the material between tiles, is porous and prone to absorbing dirt, grease, and stains. Regular cleaning not only enhances the appearance of kitchen tiles but also prevents the build-up of mold, mildew, and bacteria, promoting a healthier environment.
2. Can I use alternative cleaning solutions for the kitchen tile grout?
Yes, several alternative cleaning solutions can be effective for cleaning grout. For instance, a mixture of hydrogen peroxide and baking soda or a paste made from vinegar and baking soda can work well. It’s crucial to test these solutions in small, inconspicuous areas first to ensure they don’t damage your grout.
3. How frequently should I clean the grout in my kitchen?
The frequency of grout cleaning depends on various factors, including foot traffic, spillage, and the type of cooking activities in the kitchen. Generally, aiming for a thorough cleaning every few months can help maintain cleanliness. Regular wiping and cleaning after spills or stains occur can also prevent grout from accumulating dirt and becoming difficult to clean.
4. Is it necessary to seal grout after cleaning?
While not mandatory, sealing grout after cleaning is highly recommended. Grout sealer helps prevent staining and make future cleanings easier by creating a protective barrier against dirt, moisture, and spills. It is advisable to reapply grout sealer every year or as recommended by the manufacturer.
5. Can I use bleach to clean the kitchen tile grout?
While bleach can be effective at removing stains from grout, it’s essential to use them cautiously. Bleach can discolor or weaken certain types of grout, especially colored grout. It’s recommended to dilute bleach and perform a patch test in an inconspicuous area before using it on the entire grout surface. Additionally, ensure proper ventilation and wear protective gear when using bleach.
If you want to avail this service and other services like carpet cleaning, upholstery cleaning, home cleaning, landlords & Airbnb, and office cleaning. You can book with us now!